ℹ️ Item Import and Export is an upgraded feature available for Business and Enterprise Customers.
In this article:
Item Import
In the Web Portal, navigate to the Items menu.
Download the Template
Next, click on Import Items button on the top right of the page.

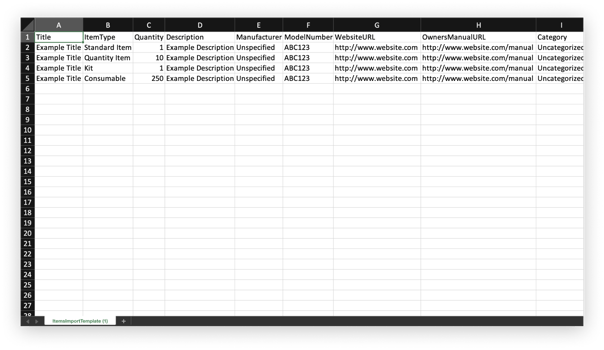
The first thing you’ll want to do is download our pre-formatted .csv template file.
- Click on Download Template to download to your computer

Caution: This template must be used for bulk Item import. You can enter one Item at a time in the file, or paste from another source as long as the columns and formatting is retained.
Populate Template
Fill out the template file and save as .csv file on your computer.
Template Fields
Here's an overview of each field on the Import Template:
- Title - is required and is the short description (50 characters) for an item.
Tip: This is a primary sort for items, so we recommend you DON’T start this with a number. For example, a 6’ foot ladder should be entered as Ladder 6’.
- ItemType - is required. Valid Types are:
- Standard Item
- Quantity Item
- Kit
- Consumable
Tip: Enable Quantity Items, Kits and Consumables via System Settings before importing your template. You will receive a formatting error when trying to import these item types without first enabling in System Settings.
- Quantity - is required and the minimum value is 1.
- ItemDetail - is optional. This is a description field and can have a LOT of information. Common uses include additional specifications for the item.
- Manufacturer - is optional, but recommended. If you enter a new manufacturer here that is not on the master list then it will be created automatically.
Note: Be careful with spelling and capitalization. DeWalt, DEWALT, and Deewalt will create separate manufacturers.
- ModelNumber - is optional.
- WebsiteURL - is optional. This field can be used to link outside web addresses to tool records in the app.
- OwnersManualURL - is optional. This field can be used to link tool manuals to tool records in the app.
- Category - is optional, but recommended. You can set up categories in advance or enter it here and it will be created automatically. Categories are useful for grouping and filtering.
Note: Just like Manufacturers, be careful with spelling and capitalization. Ladders, LADDERS and Laders are different categories!
- PurchaseDate - is optional.
- PurchasePrice - is optional, but can be used to generate costing reports of Consumables.
- WarrantyDate - is optional.
- SerialNumber - is optional.
- Barcode - is optional, but recommended. Note the following:
-
- This is an alpha-numeric field, so 0001 is different than 1. When ordering barcodes, try and start with a high number such as 10001.
- A barcode MUST be a unique number or you will receive an error message if a duplicate is found.
- Barcodes are not used with Quantity Items.
- IsRentalTool - can have a value of TRUE or FALSE. This field can designate the item as an EXTERNAL or INTERNAL rental.
- RentalStartDate - are optional and are used for external rental items.
- RentalEndDate - are optional and are used for external rental items. The rental date, if used, will trigger a notification.
- CustomRentalRate1 - CustomRentalRate4 - are optional. To use rental rates these must first be defined in Settings. Example rates may be daily, weekly, monthly, etc.
These are used if you are costing items to jobs (locations).
- CustomDate1Value - is optional. Custom fields must be enabled in Settings and a label defined. Date fields will trigger a notification.
- CustomText1Value - is optional. Text field 1 will appear beside the barcode number on the tool card. Some customers like to use this for an internal tool number or bin location for an item. Custom fields must be enabled in Settings and a label defined.
- CustomURL1Value - URL fields are useful for attaching public Dropbox documents or training videos about an item.
- CustomDate2Value - is optional. Custom fields must be enabled in Settings and a label defined. Date fields will trigger a notification.
- CustomText2Value - is optional.
- CustomURL2Value - URL fields are useful for attaching public Dropbox documents or training videos about an item.
- ReturnWarehouse - is optional. If used, Location Tracking must be enabled in Settings and the warehouse entered here must be set up.
- Last Audit Date - is optional. You can maintain this value manually or if Tool Audit has been enabled in Settings the system will update this field.
- Last Audit Condition - is optional. You can maintain this value manually or if Tool Audit has been enabled in Settings the system will update this field.
Valid conditions are:
- New
- Excellent
- Good
- Fair
- Poor
- Lost
- Stolen
- Unknown
- Vendor - is optional. This is a text field and no master list is maintained.
Import Template
To import, simply return to the Items tab and click on the Import Items button.
- Click Select File button and navigate to your completed template .csv file you saved
- Click Import

You'll see the progress as Items are being imported.

When the Item Import is complete you'll get the Import Complete screen. If there are issues with the import we'll display them here, telling you specifically what the problem was.

Tip: Send your Import template to us for review. We are glad to help out!
Warning: Importing is an ADD TO and not REPLACE. If you import the same Items twice you WILL double the number or items.
Tip: Start small. Practice importing with 10 Items. Keep it narrow such as an Import by Employee or Location.
Caution: If you are importing by Employee or Location, do NOT import quantity items. Do those separately and then loan them. You will end up with the same item with multiple records.
Don't worry! If you import 5000 items and realize you want to change something, call us and we can mass delete your data and you can re-import.
Item Export
ShareMyToolbox gives you the ability to Export your Items in Excel format. To get started, go to the Items menu.
Export All or Filtered List
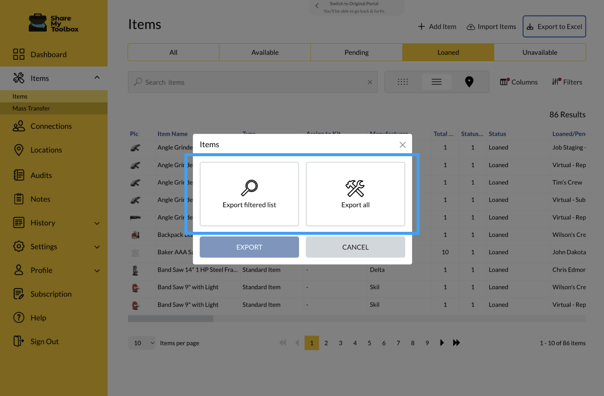
You’ll have the ability to Export your entire Items database, or you can perform a Search / Filter and just export filtered records. For example, if you want a list of Items currently Loaned, click on the Loaned tab and then click on the Export to Excel button in the top right.

When you click on the button choose Export filtered list or Export all.
Next, click EXPORT.
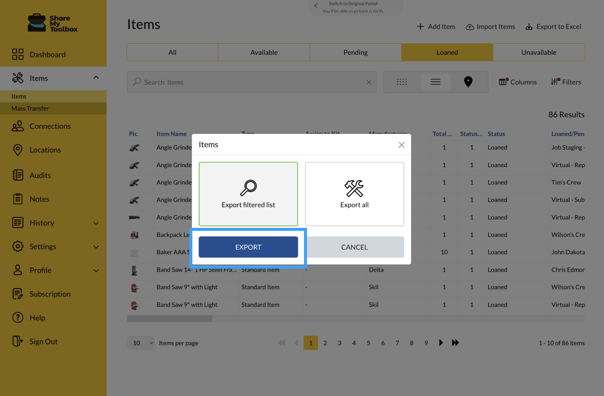
ShareMyToolbox will download an Excel file to your computer.
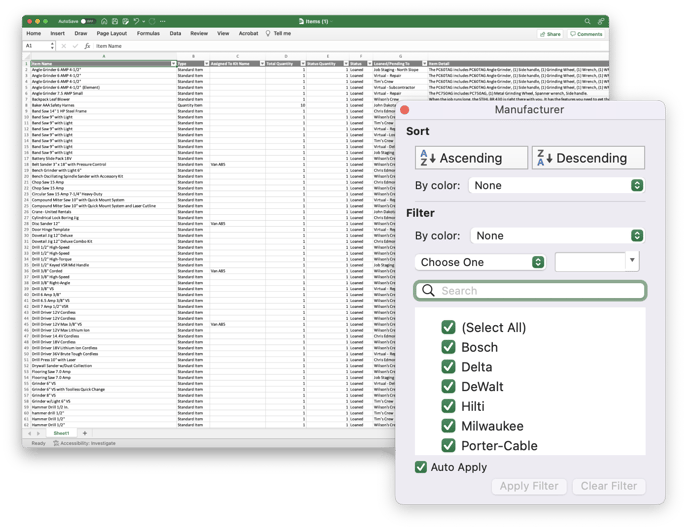
Note: Why Excel and not csv? By giving you an Excel file, we’re able to automatically add sort and filter options to the header row, giving you the ability to further analyze your Items right in Excel.