Loan, Borrow, Transfer, and Return Items
When you need to initiate the movement of an Item, you can Loan, Borrow, Field Transfer or Warehouse Transfer. This can be accomplished using the mobile app or Web Portal.
ℹ️ Web Portal and certain upgraded features available for Business and Enterprise Customers.
In this article:
Web Portal
Workflow Actions - Web Portal
Single Item Action
Multi-Item Action
Action Workflow Types: Loan, Borrow, Return, Transfer
Item Search & Filter
Processing Your Cart
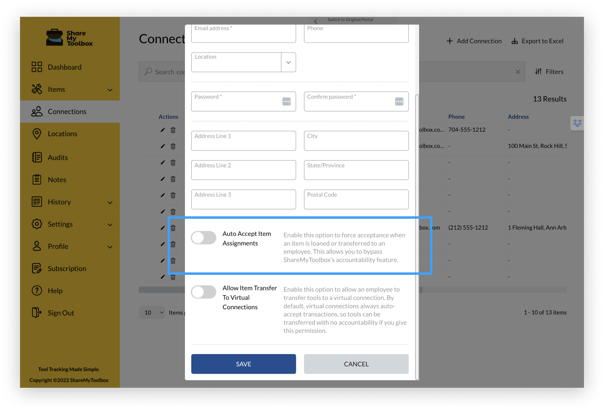
Enabling Auto Accepting Loan Assignments
Mobile App
Loaning Items on the Mobile App
Loaning Items
Loaning Items to Virtual Connections
Receiving a Loan Request Notification
Notification of Accept or Reject Loan Action
Borrowing Items on the Mobile App
Borrowing Items
Returning Items on the Mobile App
Multi-Item Workflow Actions on the Mobile App
Workflow Actions - Web Portal (Business Plans)
Using the ShareMyToolbox Web Portal, users can easily take action on one item or many Items at the same time.
Single Item Action
If you want to Loan, Borrow, Transfer, or Return a single Item, you can easily do this through the Items menu.
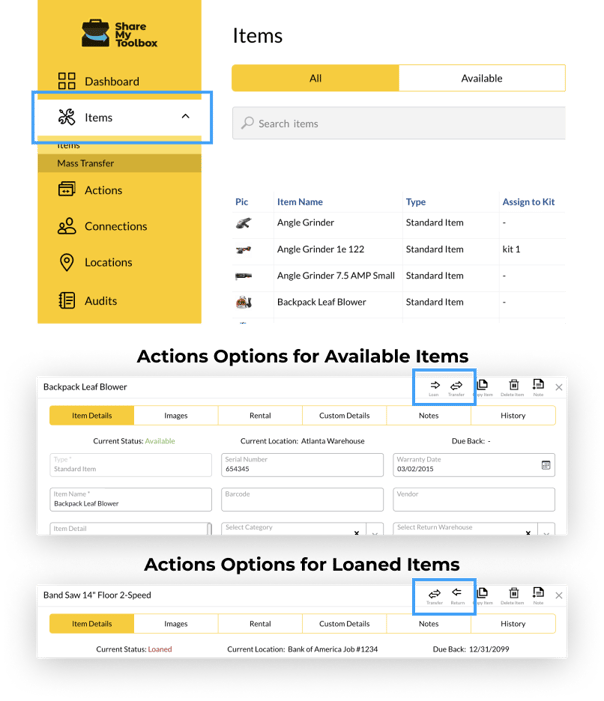
- Go to the Items menu
- Find the Item you want to take action on using Search and Filters
- Tap available Actions in the top window bar of the Item record
Note: Available Actions (Loan, Transfer, Return, Borrow) will depend on the Status of an Item and the user’s access level (Admin, Employee, etc).
Multi-Item Action
If you want to Loan, Borrow, Transfer, or Return multiple Items at a time, you can easily do this through the Actions menu. This feature allows for detailed search and filtering of Items. You then “collect” Items in a Cart where you can process all at once.
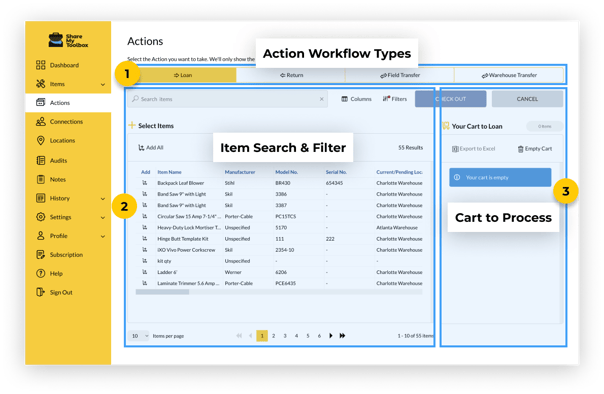
There are three essential parts to the Actions workflow tool:
- Action Workflow Types: By starting with the type of Action you wish to complete, ShareMyToolbox will pre-filter and only show you Items relevant to that type. For example, if you want to return all Items from a jobsite, by selecting Return, we only show you Items that are Loaned out. From there you can filter specific Locations, Connections, and more.
- Item Search & Filter: Just like the Items menu, this section allows for the familiar search and filter options to find exactly what you’re looking for, then adding them to the Cart.
- Cart to Process: Once you’ve collected all your Items in the Cart, simply click Check Out to begin processing your selection.
Action Workflow Types
ShareMyToolbox will pre-filter your available options based on the Action Types tab at the top of the page.
Options for Admins
- Loan
- Return
- Field Transfer
- Warehouse Transfer
Options for Employees
- Borrow
- Return
Item Search & Filter
Using the familiar Search and Filter options, you can easily find the Items you want to add to your Cart.
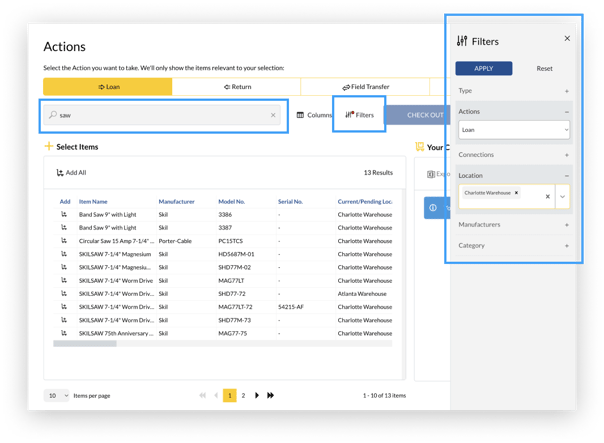
Note: The Filter will automatically include the Actions filter associated with the Action tab you are actively on. For example, if you are on the Loan tab, the Actions Filter will already be populated with Loan.
Changing the Table Columns
You may want to change the order or visibility of columns in the results window.
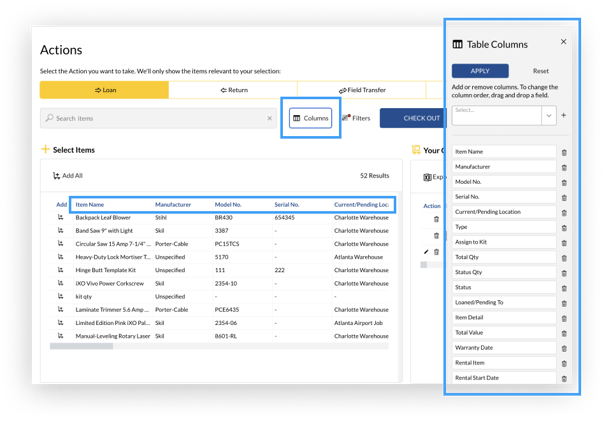
- Tap Columns button
- Remove, drag to change order, or add removed columns to your view
- Tap APPLY
Processing Your Cart
Once you find Items, you can add them one at a time, or if your filtered result includes all desired Items, you can Add All to the Cart.
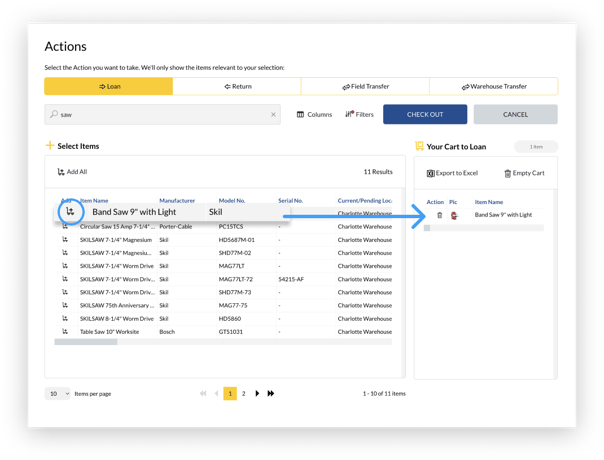
- Tap Cart icon next to the Item, or Add All icon at the top of the list
- Items will appear in your Cart on the right side of the screen
Items with available quantities will give you the additional option to select how many you wish to add to the cart.
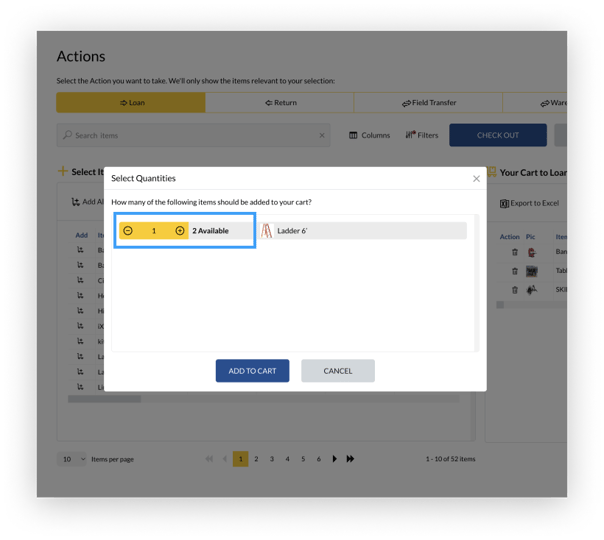
Once Items are in your Cart, you can manage your Cart in these ways:
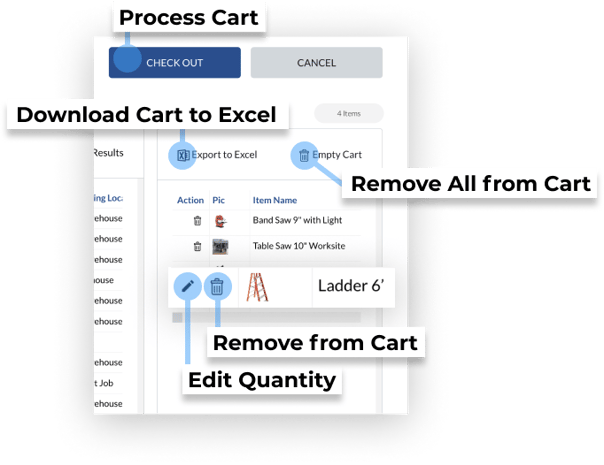
- Remove Items Individually
- Remove All Items
- Edit Quantities
- Check Out
- Download Your Cart to Excel
- Exporting the Cart to Excel will maintain your Columns formatting
Tip: Use the Download to Excel option in the Cart if you need easy access to that information for other purposes, such as to pull the Items from a Warehouse. This option also appears on the final confirmation screen once your Cart is processed.
Checking Out
Once you’re ready to process your Cart, simply tap Check Out.
Depending on your Action type, you will then get to select your options. For example, when Loaning Items, you will be able to select the Connection, New Location, Due Back date and add an Action Comment. The Action Comment will be viewable by the party receiving the Loan, as well as on the History tab.
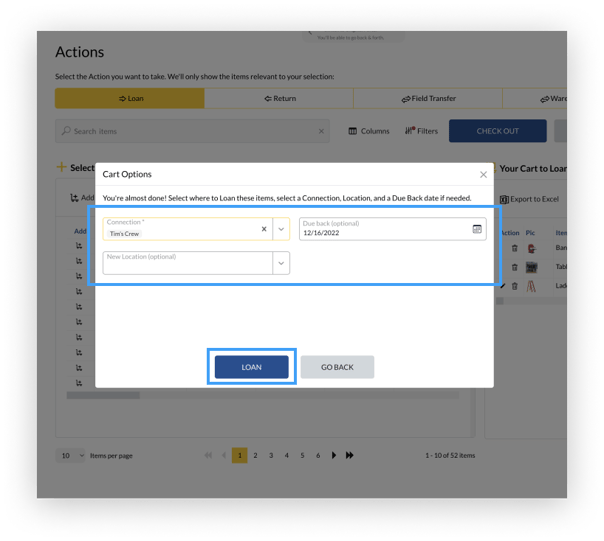
Tap the blue button (LOAN, BORROW, RETURN, TRANSFER) to complete the transaction.
Select PRINT to create a Ship Ticket.
Enabling Auto Accepting Loan Assignments
Admins have the option to set Connections to Auto Accept Item Assignments. If you enable this on a Connection, they will not receive a Loan request and will automatically be assigned the Item.
Caution: Turning on Auto Accept Item Assignments may be the best option for how your company is set up to operate. However, we encourage you to allow people to Accept or Decline assignments as it builds accountability.
Loaning Items
Loaning an Item on the Mobile App is made simple with just a few clicks.

- First, find the Available Item using Item Search
- Next, tap the Loan icon
- Fill out the information for where you want to send the Item to be Loaned
- Tap LOAN
Note: Required fields are Connection and Quantity (only shows if Item is a Quantity Item type, available for Business Plans).
Optional fields are Location, Due Back date, and Action Comment
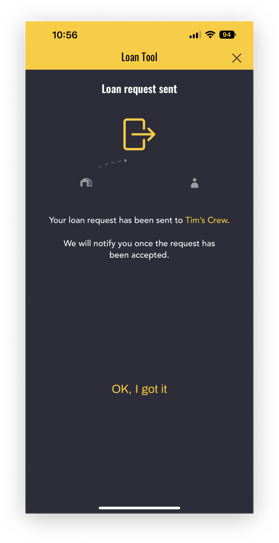
A notification is generated to the Connection you are requesting to Loan to.
Note: Your Connection has to Accept your request to Loan before the transaction is complete. Why? Because this creates accountability. Instead of the app pushing the Loan on them, by accepting the Loan they are accepting the responsibility for your Items that they borrow. 
Tip: Want to track Items but not make them available to your Connections to borrow? Simply tap Make Unavailable on the Item record.
Note: The Status of an Item temporarily changes to Pending while waiting for a request to be Accepted or Declined. This ensures the Item isn’t available for others to take action on it. they are accepting the responsibility for your Items that they borrow.
Loaning Items to Virtual Connections
If you have any Virtual Connections set up in ShareMyToolbox, you can also easily Loan Items to these Connections. The only difference between this process and loaning to Employees is that all Items will automatically be Accepted and placed into Loaned status.
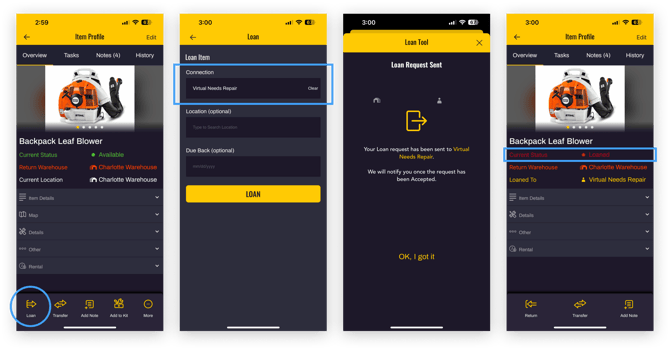
- Simply select a Virtual Connection to Loan the Item
Receiving a Loan Request Notification
The Connection receiving the Loan request will see an Action Notification in their app on the Home tab.
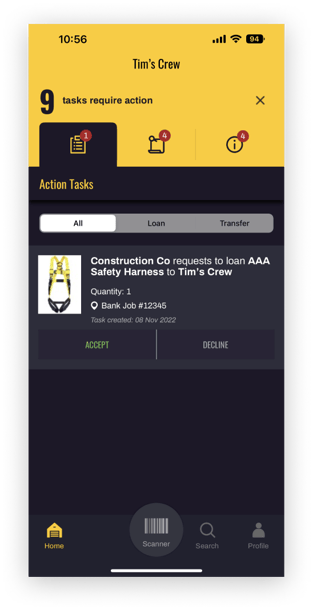
- Tap ACCEPT or DECLINE to take or reject responsibility for the Item
Notification of Accept or Reject of Loan Action
If you send a Loan request to an Employee, they have the opportunity to Accept or Decline the transaction. Once they make their selection, you will receive an Information type Task.
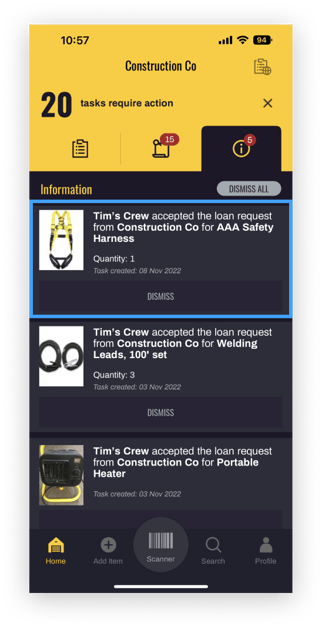
- Tap Dismiss to clear the notification
Borrowing Items on the Mobile App
Borrowing Items
Borrowing an Item works similarly to Loaning.

- Locate the Available Item using Search
- If the Item is Available, simply tap Borrow on the Item record, and optionally select a Location, Due Back date, or add an Action Comment.
- An action notification will be sent to the Admin in order to confirm.
- You will receive an Accepted or Declined for your request in your Action Information Notifications on the Home tab
Returning Items on the Mobile App

Once an Item has been physically returned, either the borrower or Admin can tap Return to move it back to its default location and made Available.
If the admin taps "Return" then the item is immediately moved from a "Loaned" status to "Available" and is removed from the employee's borrowed list.
If the employee taps "Return" then a task is generated for the admin to either "accept" or "decline" the return request. This is done to enable an employee to drop off tools at a warehouse when nobody is present to accept the tools. The employee can drop the items off and tap "Return" for each item. This will generate a list of "Tasks" for the admin. The item will remain on the employee's borrow list until the admin "accepts" the task. Once accepted then the item will change from Loaned to Available.
Note: There is an alternative workflow available. If the primary admin activates "auto-accept" for the company (Under Profile -> Account Settings in the web interface.) Then the auto-accept will immediately accept any tools Returned by the employee. This can be a useful setup option when there is not an office person available to accept returns. It reduces the accountability element of the system a bit but makes visibility easier to manage since the admin does not need to participate in the return process.
Multi-Item Workflow Actions on the Mobile App
Want to take action on many Items at once?
- On Item Search, simple tap Select above your results to select multiple Items and take action in bulk.
- If the Action you want to take is to Loan, make sure you are filtering your results by Available to ensure you are only viewing Items that are available to Loan.

Note: If you attempt to select multiple Items that don’t share the same status, ShareMyToolbox will automatically filter out available options based on this selection.
For example, if you select 2 Items that are Available, you will see the Action option to Loan or Make Unavailable. But if you were to select a third Item with the Status of Loaned, there are no valid Actions to take in bulk on those three Items. You will receive a message that there are no available actions for this combination.
❓Frequently Asked Questions
▼ Can I Loan or Borrow an Item if it’s currently Loaned?
Yes. But you either have to first return and check in the Item, or Transfer the Item
▼ How do I return a Pending Item?
Only loaned Items can be returned; however, you can cancel a pending request. The recipient of the request can decline the loan by going to the Home tab, tapping on the arrow on the top right of the screen and viewing Action Tasks. From there the request can be Accepted or Declined.

