ℹ️ Web Portal and certain upgraded features available for Business and Enterprise Customers.
In this article:
Quantity Items and Consumables
Note: Admin profiles can add and edit Items in your database. Employees can be given permission to Add Items in the employee's Connections setup.
Adding Items
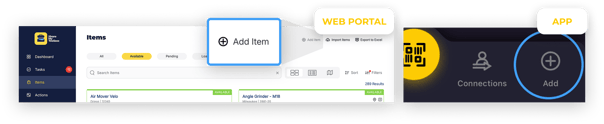
Admins or Employees with Permission can easily add Items from the ShareMyToolbox Web Portal or mobile app.
- Web Portal: From the Items menu, click on Add Item at the top of the page (Business Plans)
- Web Portal: From the Items menu, click on Import Items to download our Import Template (Business Plans)
- Mobile App: From the bottom navigation bar, tap Add Item
Employee's can create Standard Items to catalogue their current equipment when "Allow Add Tool" is enabled in the per user settings on the Connections tab. When added by an Employee, the tool is automatically loaned to its creator. See: Add, Edit, Delete Connections
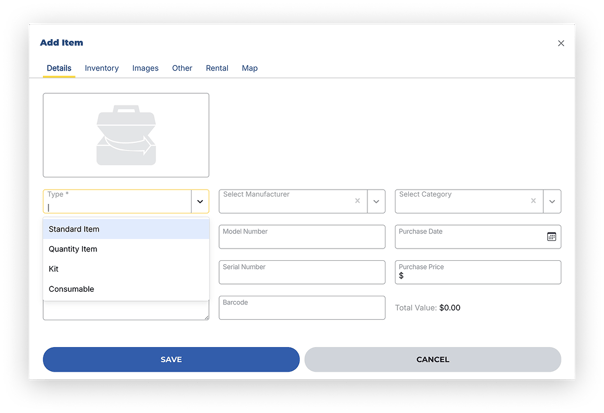
You will be presented with a blank Item record:

Choose Item Type
The first thing to select is the Item Type from the dropdown. There are 4 types of Items in ShareMyToolbox:
- Standard Item: These are your "normal" tools that are tracked individually and typically are serialized. You may also tag them with a barcode. Examples include drills, saws, compressors, etc.
- Quantity Item: These are generally less expensive items that aren't worth tracking individually and don't have serial numbers. Multiple items may be loaned to a crew at the same time. Quantity Items cannot be barcoded. Examples include shovels, safety belts, hardhats, etc. (Business Plans)
- Kit: A kit is a group of items linked together. An item defined as a kit will be the parent item and child items will be associated in a separate step. During workflow, when a kit is selected, all child items will move with the kit. Examples include a Knack box, scaffolding package, etc. (Business Plans)
- Consumable: A consumable is a material item that will not be returned. A costing transaction will be created so that it can be charged to a job. Common examples of consumables are saw blades, caulk, duct tape etc. (Business Plans)
Note: All but Standard Items must be enabled in Settings before they will display. (Business Plans)
Caution: The Item Type cannot be changed once the Item is saved.
Standard Items and Kits
You can now begin adding all of the details about your Item. Add as much or as little as you wish.
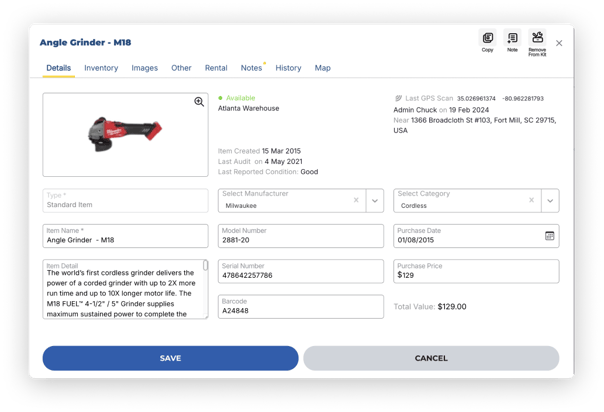
Note: The only thing required to add a new Item is Type and Name.
More Information on Select Fields
Categories
Categories are defined by you and are used for sorting and filtering. Select an
existing category from the list or enter a new one in Settings.
Category examples include:
- Ladders
- Air tools
- Battery tools
- Safety
- Saws
- Drills
Warranty Date
This is the warranty expiration date for the Item. If a date is entered, the Admin AND the Borrower will receive a notification upon expiration (or days before from
Settings).
Home Warehouse
The Home Warehouse field can be found under the Inventory Tab of the item's record.
Enter the warehouse where the item is inventoried and when the item is returned, the system will prompt the user to return the item to this location. If the item is being returned to another warehouse, you can still select another warehouse off the drop-down list.
Quantity Items and Consumables can have more than one Home Warehouse in order to maintain stock of the item across multiple storage facilities.
Note: Updating the Home Warehouse on the Item's record will NOT transfer the Item between Warehouses. If you'd like to update the Current Location of the Item, then use the Transfer workflow.
(Business Plans)

Last Audit Date
This field will appear if Audits are enabled in Settings. When an Audit is run on this Item the date will automatically be updated, however you can manually enter here as well. (Business Plans)
Last Audit Condition
Last Audit Condition will display if Audit has been enabled in Settings. This will
update automatically when an item is audited, but you can can also manually
enter a condition. (Business Plans)
Available conditions are:
- New
- Excellent
- Good
- Fair
- Poor
- Damaged
- Lost Stolen
- Unknown
Note: You can add a unique barcode or QR code in the Barcode field. This enables a mobile device to easily scan the item to view or take action.
Option not available on Quantity Items since those Items are not serialized and unique.
Tip: ShareMyToolbox adds 100 of the most common Manufacturers to the dropdown. You can easily add more in Settings.
Quantity Items and Consumables (Business Plans)
When setting up Quantity Items and Consumables, fields that aren’t applicable to those Item types will be grayed-out. You also get the additional Quantity Field, allowing you to enter the starting available quantity up to 9999. You'll establish the quantity of items on hand in the Inventory tab after selecting a Home Warehouse.
This value can be changed at any time as additional Items are purchased or disposed of.
Consumables have a workflow option on the Mobile App for editing quantities:
- Purchase
- Return
- Misc Adjustment
The advantage of using workflow is a transaction record is created for tracking
history.
Note: Adding the Item Type Consumables can be enabled in Settings.
Images
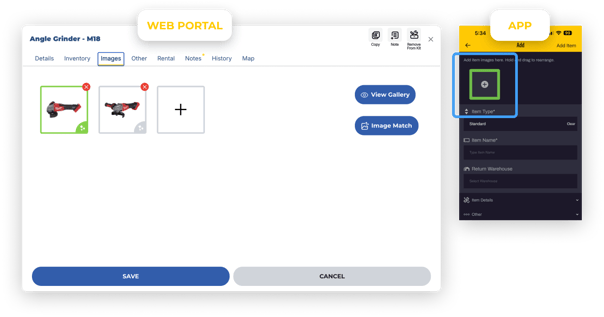
You can add up to 6 images.
- Web Portal: Click Images tab, click the + button to add an image from your computer. (Business Plans)
- Mobile App: On the main Add Item screen, tap the + to upload from your device.
Tip: You can rearrange the order of images by dragging and dropping. The image on the far left will be used as the primary image shown in search results.
Image Match
On the Web Portal, you can use the Image Match function to automatically add images.
For any Item with a Manufacturer and Model Number specified, Image Match will search and find Images, presenting them for selection for you to choose.
On the Images Tab of the Item Record, click Image Match.
Once you've selected all the images you like, simply click Add.

Rental (Business Plans)
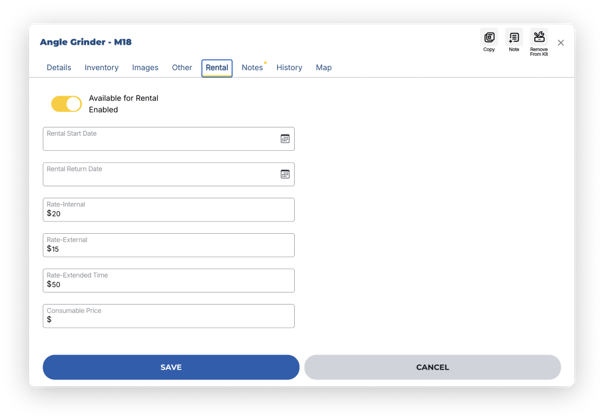
Click the Rental tab to manage Item Rental information. Rental items can be used
two ways:
- To track items rented from outside vendors
- To track internal rentals to jobs for owned Items
Enabling Rental in Settings does two things:
- Turns on the Rental fields allowing entry
- Acts as an optional filter for the Costing Report to filter only the Items marked as rental
The Rental Start and Return date is used for externally rented tools and
equipment. A notification will be sent if the return date is used.
Up to 4 rates can be entered on an item and these will appear on the costing report. The rate labels are defined in Settings.
Custom Details
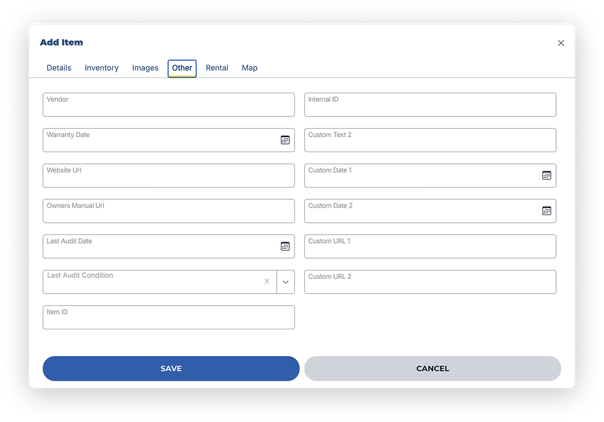
Click the Other tab to enter up to 6 custom fields of information. These
are useful for tracking any additional information that is not available by default
The labels for these fields are defined in Settings:
Dates
Two custom dates can be entered. If a date is used then a notification will be sent when the date is reached.
Text
Two custom text fields can be entered.
Tip: Text Field 1 will display on the tool card (mobile) next to the barcode. This Is useful for tracking a part number, bin location or internal tool number.
URLs
Two custom URL fields can be entered. A good example might be a link to a
training video for a tool.
Edit Items
Editing Items is simple in ShareMyToolbox. Once you’ve located the Item you wish to Edit, simply click or tap on the Item to open in Edit view.
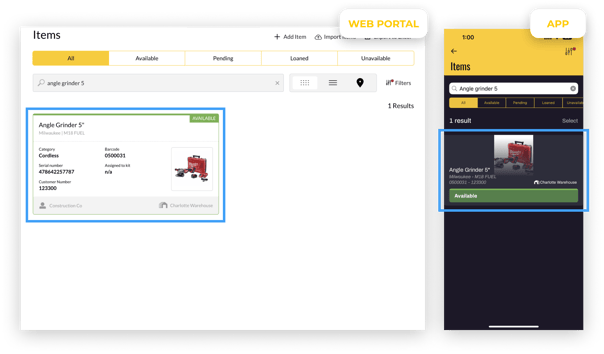
The Edit view displays the Current Status, Current Location, and Due Back date if applicable.
Once you’ve updated any details on the Item, simply click or tap Save.

Additional Options
When editing an Item, additional icons appear at the top of the page:

Copy: Copies an Item to create a new Item. Note, Serial Numbers and Barcodes are not copied since they must be unique.
Delete: Deletes the Item. Note, Item cannot be Deleted if Loaned.
Add Note: Allows you to create a new Note tied to the Item.
Kit: Add the Item to a Kit. Note, if the Item is already a Kit type, then Manage Kit will display. (Business Plans)
You’ll also notice two new tabs appear in Edit mode:
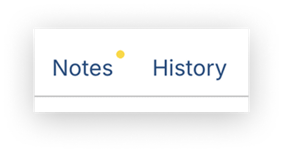
Notes: View all of the Notes for that Item
History: View all transactions for that Item