System Settings
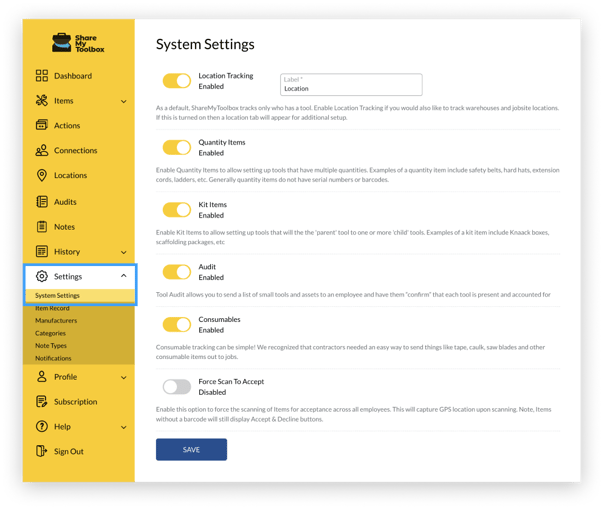
System Settings in the Web Portal controls global behavior of the platform and gives you the ability to turn on and off certain features and settings.
ℹ️ Web Portal and certain upgraded features available for Business and Enterprise Customers.
In this article:
System Settings Menu
To access the ShareMyToolbox System Settings:
- In the Web Portal click on the Settings menu item in the sidebar.
- The first submenu option for System Settings will open first by default.
- Toggle on or off the features and click SAVE to save your settings.

Location Tracking Setting
By default when an Item is Loaned you will only select an employee Connection. For most companies, if you know who has the Item then it’s their responsibility where the Item is located. Typically an Item can be taken between many jobs/locations before it’s ever returned, so it would be laborious to constantly update Locations while the employee Connection remains unchanged. However, there are a couple of scenarios where Location Tracking may be useful:
- A foreman (Employee Connection) works multiple jobs simultaneously and leaves tools at several Locations.
- The company does time and material work and the customer requires tools to be costed to the project.
These may be reasons to turn on Location Tracking. When enabled, there will be a new tab in the main menu to setup Locations.
Note: Location Tracking will require extra steps in the workflow.
Location Tracking Label
You can change the label “Location” if you desire. We do recommend leaving the default. If you do change the label you will see the new label system-wide.

- Click SAVE at the bottom of the page to take effect.
Quantity Items Setting
If you enable Quantity Items, this will appear as an Item Type when you add new Items.
Quantity Items are useful for tracking generic Items that are non-serialized and you have many on hand. For example, rather than entering 25 individual 6’ ladders, you can enter one Item with a quantity of 25.
Note: We do NOT barcode Quantity Items, so if this is needed we recommend setting up Items Individually.
Kit Items Setting
Kits are useful for grouping Items. Items within Kits can be Standard Items and Quantity Items. Once a Kit is created and Items are added, they are “locked down” and only Admins can add or remove Items from the Kit. the advantage of a Kit is it can be Loaned and all the Items within the Kit are Loaned with it.
Examples of Kits:
- A gangbox that contains 20 Items
- A truck or van that has 10 permanently assigned Items that always stay with that vehicle.
Audit Setting
Audit is a powerful accountability feature. When enabled, there will be a new tab in the main Menu to create and manage Audits
Audit requests can be sent to any Connection including Admins. The Items audited may or may not be Loaned to that Connection.
For example, a safety manager may Audit the Items Loaned to a foreman, or an Admin may Audit the Items in the warehouse.
When a user Connection receives an Audit Request, they must Scan the Items (if barecoded) to verify them and optionally enter a Condition and Note.
Consumables Setting
If you would like to inventory consumable Items, then enable this feature.
The workflow is a bit different with Consumables since regular tool Items are returned. With Consumables, these Items are used up on the job. When a Consumable is Loaned it disappears, but we create a transaction so you will be able to print a costing report charging it to jobs.
Good examples of consumables are:
- Saw blades
- Electrical tape
- Caulk
- Paint brushes
Scan to Accept Setting
Enable this option to force the scanning of Items for acceptance across all employees. You may want to enable this feature to ensure a more accurate account of your Items as ShareMyToolbox captures GPS location upon scanning.
Note: Items without a barcode will still display Accept & Decline buttons
Note: App users will need to Allow ShareMyToolbox to use their location to capture the GPS coordinates of the Item upon scan.
